 how-to
How to Design a Small Kitchen Layout
Table of Contents
- Understand Your Space and Measure Accurately
- Best Kitchen Layouts for Tight Spaces
- Small Kitchen Storage Solutions That Maximize Space
- Plan Your Work Triangle and Kitchen Flow
- Choose Compact and Integrated Appliances
- Use Kitchen Design Software for Homeowners
- Optimize Lighting, Colour, and Visual Space
- Common Mistakes to Avoid in Small Kitchen Design
- Frequently Asked Questions
Last Updated: September 18, 2026
Understand Your Space and Measure Accurately
The foundation of any successful small kitchen layout starts with precise measurements. Before you sketch designs or order components, you need to know exactly what you're working with. Measure your room's length, width, and ceiling height. Mark the positions of doors, windows, and existing plumbing or electrical outlets. These fixed points dictate what's possible.
Take photos from multiple angles and note natural light patterns. Check for uneven surfaces or awkward angles.
Create a scaled floor plan on paper or using design software. A scale of 1:20 works well (1 cm = 20 cm in reality). Mark every constraint clearly. This becomes your reference for all decisions that follow.
Best Kitchen Layouts for Tight Spaces
Three layouts dominate small kitchens: galley, L-shape, and single-wall. Each suits different room shapes and movement patterns.
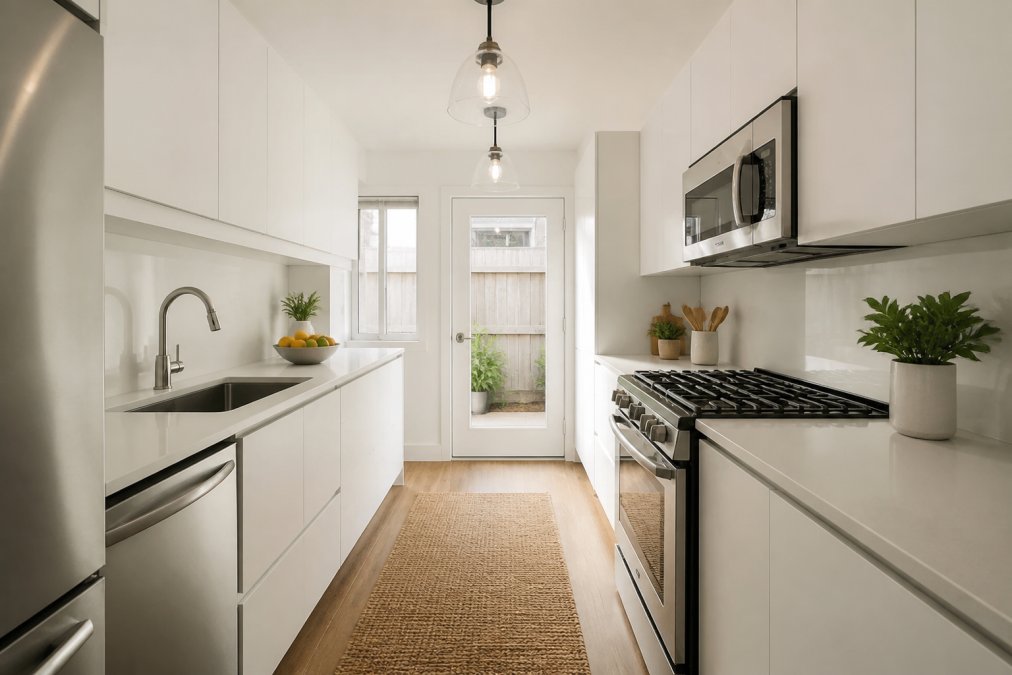
Galley Layout
A galley layout places counters and appliances on two opposing walls, creating an efficient work corridor that naturally supports the work triangle.
Galley kitchens maximize counter depth and storage on both sides with straightforward workflow. One drawback: two people can't work comfortably simultaneously in the narrow corridor.
This layout suits single occupants or couples who cook separately. It's ideal for flats or terraced houses where space is genuinely limited. The efficiency gains often outweigh the social limitations.
L-Shape Configuration
An L-shaped layout places cabinets along two perpendicular walls, creating a corner workspace with an open side ideal for storage or a small island.
L-shaped kitchens allow two people to work comfortably and feel less claustrophobic. The work triangle functions well, though the corner requires careful planning to avoid becoming a dead zone.
This layout suits families or shared households and accommodates a small table or breakfast bar. Pull-out mechanisms and carousel units help access corner storage.
Single-Wall Layout
A single-wall layout concentrates all appliances, storage, and countertop in a line, leaving the rest of the room open and visually spacious.
Single-wall kitchens demand careful planning with the sink in the middle, fridge on one end, and stove on the other. Every centimetre of countertop counts.
This layout works for studios and open-plan spaces, maximising the feeling of space though actual working space is limited.
Small Kitchen Storage Solutions That Maximize Space
Smart storage transforms limited square footage into functional workspace and prevents clutter from making the space feel cramped.
Vertical Storage and Floor-to-Ceiling Cabinetry
Vertical storage is essential in a tight footprint. Floor-to-ceiling cabinetry doubles or triples storage capacity compared to standard 600mm-high base units plus wall cabinets.
A mix of open shelving for daily items and closed cabinetry for clutter balances accessibility with visual calm. Heavy pots and frequently-used tools belong at arm height.
Handleless cabinets reduce visual weight and create clean lines. Wjskitchenwarehouse supplies custom-made carcasses that matter in small spaces.
Hidden Storage and Multi-Functional Components
Multi-functional components do double duty: kitchen islands with storage provide workspace, pull-out pantries fit narrow gaps, and corner carousels access dead space.
Drawer dividers, vertical dividers for boards and trays, and door-mounted spice racks reclaim surprising amounts of usable space.
Integrated appliances disappear into cabinetry. Fold-away worktops and hinged breakfast bars expand space on demand.
Plan Your Work Triangle and Kitchen Flow
The work triangle, connecting sink, stove, and fridge, remains the foundation of kitchen ergonomics, though small kitchens demand a different approach than standard design rules.
The Work Triangle in Micro Kitchens
Conventional design recommends 1.2 to 2.7 metres between triangle points, but small kitchens may achieve only 0.6 to 1.2 metres. This compression improves efficiency if planned correctly.
The key principle is unbroken workflow: each point must be accessible without backtracking. In a galley, you move in a line from fridge to prep to stove to sink. In an L-shape, position your sink or prep area at the corner to avoid dead zones.
Measure actual distances in your space. What matters is retrieving ingredients, preparing, cooking, and cleaning without unnecessary steps.
Positioning the Three Points
The sink should sit between the stove and fridge whenever possible, creating a natural sequence. If forced to one end, accept it, workflow matters more than symmetry.
The stove must never sit directly across from the sink due to steam and heat concerns. A diagonal or perpendicular arrangement is safer. If only a straight line works, position the stove at least 0.6 metres away.
The fridge placement is often fixed by constraints. If in a corner, ensure prep area is within one step. Corner carousels or pull-out shelves extend usable counter space.
Counter Space Within the Triangle
Your main prep area should sit within the triangle, ideally between the fridge and stove, to minimise carrying distance.
If you have one continuous counter, ensure the longest unbroken stretch sits in the middle of your triangle.
Reserve dead zones for storage, bins, or infrequently-used appliances to keep your primary workspace clear.
Adapting for Two Cooks
If two people cook simultaneously, an L-shaped kitchen works better than a galley. Position one cook at the corner prep area and one at the stove, with at least 1.2 metres of clear floor space between them.
For shared households, prioritise the layout that minimises conflict. An L-shape with a corner prep area usually outperforms a galley for multiple cooks, even if the galley is technically more efficient for one person.
Testing Your Triangle Before Committing
Before ordering cabinets, walk through your workflow in the empty space. Imagine retrieving ingredients, prepping, cooking, and cleaning. Count your steps and adjust appliance positions if you cross your own path.
Use tape to mark appliance locations and spend a day moving through the space. This reveals workflow problems that measurements alone cannot show.
Choose Compact and Integrated Appliances
Standard appliances waste space in small kitchens. Compact and integrated alternatives free up precious square metres.
Slimline dishwashers (450mm wide), under-counter fridge-freezer units, and compact cookers (600mm wide) suit small spaces.
Integrated appliances hide within cabinetry, making the kitchen feel larger and more cohesive.
Combination appliances save space. A microwave-convection oven handles multiple cooking tasks. A washer-dryer hybrid works in open-plan spaces. These multi-functional units reduce the number of separate items you need.
Use Kitchen Design Software for Homeowners
Design software lets you test layouts before committing to expensive components. Most tools are free or low-cost.
Popular options include SketchUp, RoomSketcher, and Planner 5D, which let you input dimensions, add components, and view results from different angles.
Wjskitchenwarehouse uses Articad CAD software to create detailed 3D models with custom-made carcasses and doors positioned precisely, ensuring components fit perfectly.
Start with free software to explore ideas. For professional-grade design with guaranteed accuracy, our design service provides detailed plans and confidence that everything will fit.
Optimize Lighting, Colour, and Visual Space
Small kitchens feel larger with the right lighting and colour scheme. Most guides ignore colour temperature and light quality, which psychologically affect perceived space.
Task and Ambient Lighting
Task lighting illuminates work surfaces: under-cabinet LED strips light countertops, pendant lights above islands provide focused brightness, and recessed or track lighting distributes even illumination.
Ambient lighting creates overall brightness and mood through ceiling-mounted fixtures or diffused track lighting. Dimmers adjust brightness. Layering task and ambient lighting prevents dark corners that make spaces feel cramped.
LED bulbs are essential in small kitchens. They produce less heat, keeping the room cooler, and last 15,000 to 50,000 hours compared to 1,000 hours for incandescent bulbs.
Colour Temperature: The Hidden Factor
This is where most small kitchen guides fall short. The colour temperature of your bulbs, measured in Kelvin (K), directly affects whether the space feels warm and cosy or cold and cramped.
Warm white (2700K) feels inviting but can make small spaces feel darker because warm light absorbs into surfaces. Use it in dining areas or accent lighting, not primary task lighting.
Neutral white (4000K) is ideal for small kitchens. It provides clarity for cooking tasks and reflects off surfaces, making the space feel brighter and more open.
Cool white (5000K-6500K) can feel harsh in small, enclosed spaces.
Colour Rendering Index (CRI): Why It Matters
CRI measures how accurately a light source reveals true colours, ranging from 0 to 100.
Reflective Surfaces and Light Distribution
Light colours expand visual space. White, cream, and pale grey reflect light and feel airy. Dark colours absorb light and make rooms feel smaller.
Colour Palettes and Visual Continuity
Monochromatic colour schemes create visual continuity and reduce clutter. A white kitchen with cream and light grey accents feels larger than one mixed with bold colours.
Practical Lighting Layout for Small Kitchens
For a kitchen under 80 square metres, use this three-layer approach:
- Ambient layer: One or two ceiling-mounted 4000K fixtures (CRI 90+) with dimmers.
- Task layer: Under-cabinet LED strips (4000K, CRI 90+) above prep counters and sink.
- Accent layer: Optional pendant lights above an island or breakfast bar (4000K, CRI 90+).
Common Mistakes to Avoid in Small Kitchen Design
Oversized appliances dominate small rooms and leave no countertop space. Always choose compact or integrated alternatives.
Frequently Asked Questions
What is the most efficient small kitchen layout?
The galley layout is often most efficient for small kitchens because it creates a compact work triangle between sink, cooker, and refrigerator. An L-shape layout works well if you have a corner to utilise, maximising counter space and storage. The key is minimising the distance between prep zones and ensuring appliances are positioned to create natural workflow without cross-traffic.
How can small kitchen storage solutions make my space feel less cramped?
Vertical storage using floor-to-ceiling cabinetry draws the eye upward and creates visual space. Open shelving in one area can reduce visual weight, whilst handleless cabinets maintain a clean, minimalist aesthetic. Hidden storage mechanisms, such as pull-out drawers and corner carousels, keep clutter out of sight. Bespoke joinery designed specifically for your footprint eliminates wasted space and maximises every centimetre.
What colour scheme makes a small kitchen look bigger?
Monochromatic or light colour palettes make small kitchens feel more spacious. White, soft greys, and pale neutrals reflect light and reduce visual weight. Reflective surfaces like glossy cabinet doors and splashbacks amplify natural and artificial light. Avoid dark colours on large surfaces; if you want depth, use it as an accent on one wall or lower cabinetry only.
Can kitchen design software for homeowners help me plan my layout accurately?
Yes, design software allows you to input exact measurements and experiment with appliance placement, storage options, and layouts before committing to purchases. Many tools offer 2D and 3D visualisation, helping you understand how your space will flow. However, professional design services using CAD software can catch structural constraints and optimisation opportunities you might miss, ensuring your custom components fit perfectly.